

Do it Right: Steak on the Grill
Growing up, my family was not a steak-and-baked-potatoes-on-Sunday type of family.
Early, with money tight, we were more likely to serve up chipped beef on toast, or liver and onions, or – hell – Dinty More beef stew with buttered bread.
But my parents displayed an adventurousness with meal prep that made an impression on me. And only grew as they grew into their careers, and we could afford more ingredients to experiment with.
Memories of my dad over the range or grill are probably most deeply ingrained from the days when mom worked nights at the pharmacy, or later, when she went back to school to earn her teaching degree. We learned early that real men cook.
Dad had a flair for throwing together ingredients, with most combinations designed to please boys under 10.
His slum gullion combined macaroni noodles, ground beef, onions and green pepper in a big skillet — plentiful portions, cheap, and easily topped with ketchup.
Sloppy Joe again employed ground beef, with Campbell’s chicken gumbo stirred in, blended with mustard, ketchup and onion, and spooned onto hamburger buns. The time I put away four of the sandwiches is recorded in family lore, as is Dad’s story of serving the dish when he worked on a cattle drive out West, inventing it. “That sure is sloppy, Joe,” one of the ranch hands reportedly said. Even though Dad’s name is Fred.
Eggs and potatoes, corned beef hash, spaghetti with homemade meatballs, and his rendition of his University of Cincinnati favorite, Sky Line Chili, all were plated from Fred’s kitchen. But he was maybe most at home over his Weber grill, slinging summer dogs, brats, chicken and burgers.
Steaks weren’t part of the summertime repertoire. I think the first one I ever tried was during a second grade awards dinner. I remember riding along with my teacher to what seemed like a distant, exotic banquet, something out of the Wizard of Oz, and being instructed in the finer points of putting a napkin in my lap, of which hands to wield the knife and fork in, and how to unwrap and consume the foil-blanketed baked potatoes.
We were more likely than not still supping on hamburg gravy over toast at home.
So, I still consider my homemade steak and potato dinners a treat. And I put a lot into my preparation and enjoyment of them. Usually on Sundays. Almost always on my own Weber grill. I’m not pretending to be another Anthony Bourdain or Steve Raichlen (whose Barbecue Bible, nonetheless, I steal inspiration and certain steps from). Just Frederick Colt Foutz, descendant of Frederick Charles, whipping together ingredients for enough years and for my own table full of hungry boys, so that I develop my own approach to it, my own appreciation for what works.
Doing it this way is “right” for me. Make of it what you will. I make of it… dinner!

Sunday Steak ala Fred
1. The Right Steaks
We’re blessed, in South Dakota, with being in the meaty Midwest, with nearly 5 beef cattle to every resident of our state. What it means is a good selection of local cuts at the grocery store. I don’t try to get any more exotic than the 8- or 12-ounce NY Strips cut right by the butcher at Hy-Vee.

2. Time to Marinade
Prep time for me starts about 2 to 3 hours before I light the grill. I usually cook steaks I buy the same day from the store — never having frozen them — sometimes unwrapping them right after I put all the other groceries away. I lay them out on a standard dinner plate and — I don’t find where I read this, or remember even if I read this — I take a fork and poke each side full of a bunch of little holes. Sounds like sacrilege, I know, but I’ve never experienced any loss of juiciness or flavor. It’s just my method for tendering up the meat, giving even more places for the dry marinade to work its way in. I’ve sometimes used a liquid marinade, like the mesquite or steakhouse varieties from Lawry’s, but I prefer to go dry for most of my grilled dishes. I sprinkle another local blend of spices, from Cookie’s — salt, pepper, garlic, chili powder, red pepper and a hint of sugar — right out of Wall Lake, Iowa. I put just enough on both sides and let it work in the fridge until it’s time to grill.


3. Soaking Chips
I don’t use wood chips when I grill brats or hot dogs. Not even burgers, most of the time. But for foods I like to take a little longer to grill — and close the lid to control the temperature and let them get extra smoke-infused — about an hour or so before lighting the grill I take about 2 to 3 handfuls of hickory or mesquite wood chips and soak them in a big cup or bowl of water. In this case, I’ve pressed this old Campbell’s soup cup into service for as long as I’ve been grilling for myself. It holds the perfect amount to give everything an authentic tinge of smoke flavor, as opposed to the liquid smoke I shut my eyes and squeeze into crock pot concoctions when it’s negative 20 degrees out come January.

4. Lighting the Grill
If I’m fixing anything longer-term inside to accompany the grilled delights from outside, I might start the oven a good 15 minutes before I light the grill (more on that later). But I get the grill going nice and early to give me time for other food prep inside while the charcoal burns through the initial flames and gets nice and ashed over. I’ve used a chimney starter the last six years or so, and I like the way it starts fast, burns evenly and saves my recipes from any lighter fluid smell or taste. (Yech.) I get about 15-20 minutes inside as the starter does its thing. And I use that to…


5. (Of Course) Grilled Onions
… prep the perfect accompaniment to grilled steaks in my book. That’s grilled onions! I get a good, small to medium white onion, wash it thoroughly, but leave the skin on. I cut it into quarters, flip them over to the inside and coat each with a generous brushing of extra virgin olive oil. It’s a chance to use the green (for vegetables, natch) rubber basting brush and to cheat a little, since it’s all in the service of glorious meat. These babies grill up nice at the edges of the grate, around the steaks, skin-side down so you can baste a little as needed, but I find they’re the most tasty after applying that generous swipe of the brush inside and letting them crinkle and burn a bit at the edges and brown through the centers. Yum, and if you’re inclined, Yum-o.

6. Unleash the Chips!
Another important step, once the coals are ready, is to give them a couple minutes to heat the grilling grate after spreading them out more or less evenly. I like to make sure I’ve got some varying levels of heat in the center and low heat on the edges, so I deploy the tongs to get the surface just right. I throw the chips on, first emptying the water out around my splayed fingers over the top of the cup (into the grass) and then distributing them pretty evenly around the outer edges of the charcoal. Even though they’ve been soaking for an hour or so, they’ll still burn a little and create flames, so I want to avoid any flareups directly under where the steaks are going to go, in the center of the grate. Once the chips are on, I throw the grate on, leave the lid off, and give the great that couple minutes to develop some searing heat.

7. Searing the First Side
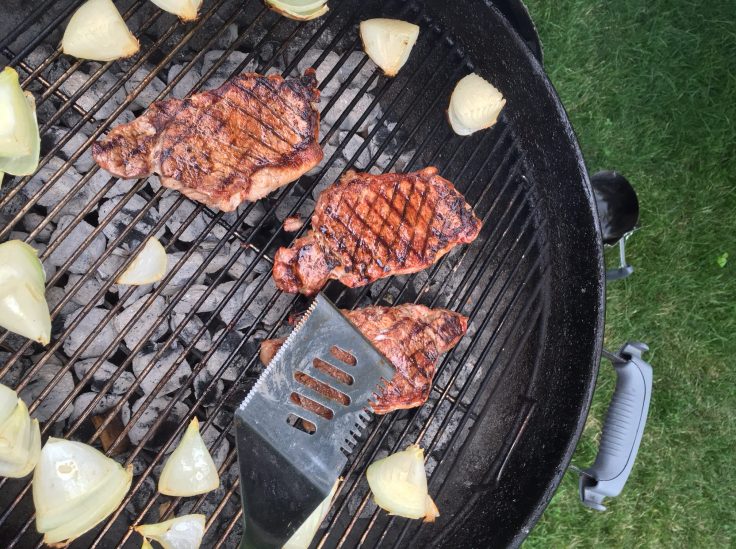
An old rule from somewhere is that if you’re grilling over direct heat (with no lid) you should be able to hold your open hand about grate-high over the coals for no more than two seconds before snatching it away. I definitely like to start out that hot for searing purposes. I arrange the steaks in the center of the grate with an eye toward rotating them 90 degrees after about 2 minutes so I can get some good cross-hatch grill marks on the underside. The onions go husk-side down around the outer edge where there’s enough heat to get them going. In the pictures above, I messed up a little, using a larger set of tongs than I usually do (campfire or kitchen tongs work best) to bring the onions from plate to grate. I also got a little greedy, trying to make the most of a plastic-wrapped onion that I discovered in the fridge that was a bit softer than the fresh onion I bought that day, which made it a little looser in its skin. Which only emphasizes why you don’t need to do any peeling — cut the onion in a way that it will hold together naturally and you have less of a mess to contend with on the grill. Still… a delicious mess. I went with it.


8. Letting the Lid Work Its Magic
No less a grill savant than my dad has precise ways he employs his Weber grill lid to make the perfect kettle meal. He’ll arrange the vents so the wind is blowing perfectly through the lower vents through the lid vents on the other side, turning the grill as he cooks to keep it in tune. I’m less worried about that, but I do favor grilling with the lid on so those well-soaked wood chips can smoke away and so I keep the temperature and flare-ups from getting out of control. It’s a little hard to keep your eyes off of what’s working inside, but if you’ve laid out the charcoal and the food in a way that you’ve got mostly even heat, you don’t need to fuss too much. A beer helps wile away the minutes. In this case, a Surly Furious IPA. Ahhhhhh.

9. Time to FLIP!
I really dig those grill marks, so I let the cross-hatch work its way into steaks, hopefully on medium and lowering heat, for about 3.5 to 5 minutes on the first side. Then I FLIP, rearranging the steaks so that the heat is still even, not afraid to move them around from the center if it’s getting too toasty there, and I make any adjustments to the onions that are necessary. This is going to be a fast grill over high heat, so I am not too worried about basting or anything at this point. Just keeping things positioned so the heat doesn’t get ahead of me.

10. Testing for Doneness
Don’t let that subhead fool you. There is never, ever a reason for me to go poking or cutting or pressing the steaks so that I cause a flare-up or let the juices out. I may just lightly test the surface of the steak with the edge of my spatula or even a (clean!) finger. Here’s how Raichlen puts it:
The best way to check for doneness is to use the poke test: Press the thickest part of the steak with your finger. When the meat is rare, it will feel soft and squishy. When medium-rare, the meat will feel semi-soft and yielding. When medium, the meat will yield just a little, while when well-done, the meat will feel hard and springy.


11. Final Touches
I’ll pull the steaks off first and let the onions have a little longer as I let the steak rest, allowing the juices to redistribute. I give the steaks a final brush across the top with olive oil, then gather up the onions and cut away the blackened outer layers, distributing the juicy, flavorful, grilled onions around and on top of the finished steaks to soak up even more flavor.

12. Proper Accompaniment
Every good steak needs a friend. I’m pretty flexible on what I’m drinking when I’m savoring — an ice cold beer of firm body (red, brown, IPA), or else my favorite Cabernet, from Stag’s Leap (OK, that’s a little particular) — but I do insist on twice-baked potatoes. The kind with cheddar and bacon. All right, and I’ll allow corn or a green vegetable, even. I’m not particular about that. The steak is the main attraction. And it. Is. Just. RIGHT.


It looks delicious!
LikeLike