

Do it Right: Bratwurst on the Grill
Good recipes, like a marriage, take a lot of work. A bit of trial, a bit more of error, until you know enough to savor the sweet successes.
My wife bought me my first full-sized Weber charcoal grill in the first year after we got hitched. Call it another of her astonishing leaps of faith in me: that I would one day master the tricks of flame and smoke and flavor enough for us to not only draw nourishment from what came off the grill, but enjoy it.
The first experiments were not exactly promising. Too crispy, too runny, with too much essence of briquette and not enough essence of brisket. The flames burned too hot, or sputtered out too soon. Am ambitious, first-time undertaking — ribs, beercan chicken — turned into a walk to the pub to regroup and make another run another day.
But the breakthroughs, ah, those are the meals when you pinch yourself, remember that what you make at home can surpass nearly all the dinners out. With that foundation, over the years, you add the little touches — the right blend of seasoning, the extra minute of searing that seals in the juices, the perfect beverage that seems to add an extra pop to each bite.
And then, voila. You’ve got a staple in the rotation that you can count on, and anticipate, for years to come.
I don’t mean to be overselling today’s blog fare. Brats are basic. Brats are easy. Throw ’em on high heat, flip ’em every so often, throw ’em in a bun, and it’s classic July picnic food.
Ah, but plenty of us get married. About 50% stay married. Even fewer still stay teasing, giggling, cuddling, smiling happily attached. And that’s what I’m going for here. A lasting love affair with a barbecue staple.
Here’s how I do it today, after a hundred — or more? — cracks at it. The little refinements, the mini disasters, the minor miracles… make it taste all the better.

Grilled brats – my way
1. It’s about the meat
Though my dad was quite the brat man, and perpetually to be found over his grill back home in Ohio — and though I borrow a few of his techniques — the first and crucial step to grilling the perfect brats I made my own based on where I called home in my 20s and 30s.
For a lot of people, you say brats and they think Johnsonville. But to me, that’s like someone saying beer and you fixate on Budweiser, or — shudder — Miller. (Or even, we whisper: Miller Lite.)
SHAKE IT OFF.
OK. There’s a world of flavor beyond the five teeny tiny ground meat sausages Johnsonville deems fit to put in their frozen packages. And in Chicago, one of the meatiest cities in our nation of meat, I didn’t need to settle. I could get my brats straight from the butcher, nice and long, full of flavor, hearty over the flame and in whatever quantity I chose. Like, say, a good package of eight to match the variety of delightful sausage rolls in ample supply at any Windy City grocer.
Sioux Falls, South Dakota, our current home, may not have caught on to sausage roll heaven, but they are still gainfully engaged in the meat industry. (The whole town has a tendency to reek of it ever so often — a noble sacrifice we make for our noble grub.) I’d much rather take home a wax-wrapped package of eight fresh-cut brats, choosing from beer, bacon and chedder, jalapeno, and other great varieties, then cracking open that styrofoam-packed, aging block of frozen mini Johnsonvilles.
And today I bring home the fresh-baked buns on offing at the local Hyvee. Hot dog buns are fine — the better to make those beautiful brats fill out the finished dish all the larger.

2. Soaking the wood chips
Much like my approach to steak, I like my grilled fare bold and smoky.
About 2 to 3 hours before I fire up the grill, I take a couple handfuls of hickory or mesquite wood chips and soak them in a cup of water. The wetter, the better as it kicks off more smoke and limits flareups caused by the chips burning.
I enjoy prepping like this, the time to instill just a smidge more flavor in what might otherwise be a pretty methodical operation.


3. Lighting the grill
About a half hour to 45 minutes before mealtime, I head out and light the grill.
I use a chimney starter and load the bottom with about three or four crumpled sheets of newspaper. If I’ve got some good old charcoal left over, I scoop that on top of a batch of new charcoal and light the newspaper below in a few places.
I want enough charcoal for a single layer beneath the grilling grate, with maybe a few gaps on the very outer edge for moving any meat that is getting too much love, and later, for grilling the buns.
While the chimney starter does its work, I head inside for more prep.


4. Boiling the brats
This is a technique borrowed from Dad, and it hasn’t steered me wrong.
About the time I start soaking the wood chips, I peel about 2 tallboy cans of beer (16 ounces) from a ring of Pabst Blue Ribbon or Coors Banquet and leave them on the counter by the stove.
When the grill is lit, I head inside and pour the beer into a big stewpot, load in the brats, and set the burner on high.
I want them to get to boiling for about 10 minutes, just enough to develop a tough outer skin that will seal in the juices when they’re grilling and develop some nice char and smoke flavor once over the flames.
I keep an eye on the burner as I busy myself with the next step — although the aroma of boiling beer isn’t unpleasant, having it boil over and crust the stovetop isn’t. And doesn’t endear me to my number one grilling fan, Mrs. Do It Right.
On the beer: though I’ve tried a few times to see what I’ll get from a more noble vintage than your average ice-cold Saturday brew, and sacrificed a few unwanted berry weisses or stout porters, what ends up working best is just a cheap six-pack of PBR or Coors. In Chicago, I was fond of throwing in Old Style.
And hey, it doesn’t sip badly while you’re tending the grill, either. Best not to overdo it.
You also don’t want to overdo the boiling. We’re not out to cook the brats twice — once in beer, then on the grill — and thereby leech out all the flavor. Think of it as adding another layer of complexity in the cooking process, while also hedging your bets on the need to cook pork thoroughly. This is a bit of pre-cooking, the better to spend a smidge less time over the open flame and seal in that juiciness.


5. Nice (garlic) buns!
In college, I had the pleasure of dining for many dozens of Sundays on a true, master grillman’s grub. As I recall, he crisped the buns for his burgers before serving them, and that extra touch made them all the more scrumptious.
I don’t remember if he did the same for brats, or if he introduced garlic into the mix, but at some point, early on, I did. And it’s become the way it’s done ever since.
I already addressed the need for a sturdy sausage roll or bakery-tough bun to stand up to the heat of the grill. If you’ve got to use a bread knife to split them open, that’s a good sign. I make sure not to separate the two halves when I cut them, instead, leaving them connected like a good “slipper shell” you might uncover on a walk down the beach.
I then spread butter or soft margarine over the entire length of both halves, followed by a generous sprinkle of garlic powder over the same.
Important to note: garlic salt is great for burger seasoning, or flavoring the mix for instant mashed potatoes, but the exact wrong ingredient for toasted garlic buns. Go for garlic powder, or garlic bread seasoning (without the cheese). Just enough to add a little zing to the finished concoction.


6. ‘Triple B’ basting sauce
I began my grilling apprenticeship petrified of over-cooking, of rendering a beautiful cut of meat tougher than a pair of my old hiking boots, and comparable in taste.
So I tend to layer on the flavor. Oh, I’ve gotten a bit more stingy as I’ve matured, wanting to preserve the natural flavor of burgers, steaks, chicken and not obliterate it with so much salt and vinegar and sugar. But I’m a diligent baster all the same.
My concoction for brushing the brats and keeping them succulent and not singed is a simple blend of three B’s — butter, barbecue sauce and just a splash of beer.
I take a generous two to three tablespoons of butter or margarine and set the microwave to 25 to 30 seconds to melt it. Then I whisk in about an equal or lesser amount of barbecue sauce.
I tend to favor one of two types of barbecue sauce. Sweet Baby Ray’s was big in Chicago, and now you can find just about everywhere. I like the honey barbecue to mellow things out. Or else I go with our Kansas City favorite — Jack’s Stack Original. It’s got just enough smoke and spice to dial the brats up a notch or two.
The beer sometimes makes it in, sometimes not. If I’ve made things a little too thick with sauce, it thins things out a little. But I have to take extra care to avoid flareups.


7. Say hello to the flames
When the brats have boiled themselves a little brown, in a nice beery froth; and the buns are all buttered and dusted; and the triple B mix is ready to baste; I haul the whole bundle out to the deck and get the coals spread out and ready.
I usually give the grate about 2 to 3 minutes to heat up, with the handfuls of smoking chips already deposited, before I lay the meat out.
On a recent Sunday I added some burger patties to the smorgasbord, and placed them on the outer edges while arranging the eight brats in the center, straggling the grate lengthwise so they’d get some gorgeous grill marks.
If you’re grilling for a ton of folks, I suppose you could wedge the brats or dogs in between the grate bars, but what fun would that be? I prefer cooking for my family and maybe a few guests, max, for this reason. Much more manageable, much more open to these little extra touches that pack in extra pleasure when it’s time to sit down and dig in.

8. Hurry up and wait
Although grilling burgers, brats and steaks is a high-heat operation, and can often be accomplished with the lid off and prime attention to the proceedings, I prefer to throw the lid on and let the magic work outself inside, barring any flare-ups.
I’m after smoke, and maybe a little extra time on the grill at a little lower temperature. I find between 300 to 400, maybe a little higher, is ideal.
Unlike with steaks, i don’t have to turn the brats too often. I’m just looking to get them good and grilled on side one, then flip. Making small adjustments to their location and position to ensure they don’t get overdone.
A good beer, of course, is a great way to pass the time. I’m not picky during the grilling process — one of those PBR tallboys still in the fridge is the perfect companion to while away the minutes. Usually about 3 to 5 minutes for the first side.


9. Bastin’ Time
When I’m ready to flip, I haul the basting bowl with me and give every brat a generous brush.
Yes, you have to be careful to not drip on the flames, or brush too much one and cause flareups. Some might wait till the whole process is over and baste in the last couple minutes on the grill. But I’ve found that with the lid as cover, and with a bit of attention, you can achieve a nice, smoky, crispy layer to pair with the juicy inside.
And that’s just awesome.


10. Final flip and baste + BUNS
After another 3 to 4 minutes, the brats are just about done. I like to give them an extra turn and baste the side that didn’t get the sauce on the first flip.
While that works in, I can use the outer edges of the grill to rotate in the buns.
Good, sturdy sausage rolls, or the kind of buns baked hearty at your grocer, can stand up to the heat of the coals just long enough to bake in the butter and garlic. You want that lower heat on the outside of the grate so you don’t burn them, but a little toasting isn’t going to ruin your day.
I tend to prop them up a little instead of laying them flat, which is why keeping that hinge and not cutting all the way through the bun is a good idea. The edges, most prone to burning, are not lying flat and the rest of the top and bottom surfaces are angled enough that they won’t get too grimy or go up in flames.
Just about 2 minutes is enough for this last step. If the fire has behaved, I can usually offload a brat into a bun one at a time. But if I have to hustle, I’ll bring a big casserole dish and a serving plate and offload either the buns or brats first, whichever is most at peril. But I always serve them brats in buns, fully assembled.


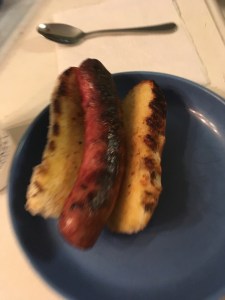

The perfectly grilled brat will have a little char, a bit of smokiness, a lot of juice, and, in my recipe, toasted garlic buns.
11. Final basting and enjoyment
If there’s one barbecue rule I never break it’s to let the meat sit for a few minutes after grilling to let the tastiness flow back into it — you’ve got to let the juices recirculate after percolating over the high heat for the last 10-15 minutes.
That’s a great time to grab the tongs and slide these beautiful brats into their golden-brown garlic buns.
I arrange them on a plate so there are six across in the middle and two filling out each side. When they’re arranged thus, I give each a final swipe of the triple B sauce and observe them in their full, grilled glory.
Then it’s time to take a scrumptious bite. I like mine with Heinz ketchup (is there any, better kind?) and whatever cheap yellow mustard we have in the fridge. No need for further adornment, let the smoke, and char, and juicy pork, and toasted garlic do their work on your tastebuds.
ENJOY!

Hi Colt. Great blog……..fun to read and good tips! I am a long time Weber Grill user and will have to try your method on brats. I’ve been taking the short-cut of using Johnsonville “Smoked Brats” and giving them maybe 6 minutes on the grill. Something more substantial and juicier would be an improvement and worth the extra effort. Only point of departure is a nice craft IPA for the sipping part! Bells Two Hearted is the favorite here in Michigan.
LikeLike